Helpful Gardening Information


Beginning gardeners or experienced, we all can learn something. For those just starting out there are many sources of information online. Use your favorite search engine to find pictures and articles to help you on your way to successful gardening. There are thousands of gardening blogs to help you with subjective advice. We've started listing them here on our blog page.

Our local library and more broadly, our county library system allows you to find the latest and greatest in magazines, videos and books both traditional paper and digitally downloadable.

The more you learn the more enthusiastic you become, which creates a  more effective gardener. In a community garden there is a social element too. The ability to learn from more experienced gardeners or a mentor is a wonderful perk.  


Long Valley Frost Dates


Zone 6 When To Seed & Plant

These are approximate times to seed and plant as per www.veggieharvest.com

Bugs & Soil

Please read this important page of information to educate yourself about organic practices in the garden. There are so many liviing organisms dependent upon good soil handling that most people are totally unaware of. Articles on this page will help you better understand this important issue. CLICK HERE


Gardening With Children


We encourage our members to bring children to the garden. Nothing quite compares to starting something from seed or seedling. Seeing the results of your care and attention grow to maturity in such a short time is a good experience for children who can be impatient to see the end results. Even bad results are a great learning tool. It teaches them method, cause and effect, natural conditions in the environment that influence us and so much more. Here is a page we created with ideas for gardening with children. CLICK HERE


Garden Creations

Garden art and structures enhance any garden area when used effectively and in balance with the natural beauty of plantlife. More on this subject may be found HERE.


Vermiculite vs Perlite: What is the difference?

Several years ago, I had an experience where I specifically needed perlite for a gardening project. When I got to the gardening section of this store, I discovered that they were out of perlite. I asked a store employee for help, and he confirmed that perlite was indeed out of stock everywhere in the store. Instead, the employee tried to sell me vermiculite, insisting they were basically the same thing. While this is true in one respect, this mistake could also ruin your project. While working for the same purpose in one respect, perlite and vermiculite are completely opposite in another. So it is important to know the difference between perlite and vermiculite so that you are never influenced to do something that could ruin your gardening projects by incompetent store employees.


Vermiculite and perlite are both non-organic soil additives that are used to aerate the soil. As rooting mediums, they offer this same benefit. Vermiculite is a spongy material made from mica whereas perlite is a type of highly porous volcanic glass that resembles pumice. Perlite appears as small, round, non-uniform, white particles. Some people mistake perlite in potting soil mixtures for Styrofoam balls. While both mediums are used for aeration, they cannot always be used interchangeably.


Both perlite and vermiculite are great at retaining water, but vermiculite retains much more water and offers a little less aeration than perlite. Vermiculite literally acts as a sponge that will retain water to the point of saturation. Perlite holds water by having a large amount of surface area within the nooks and crevices of its vast pores. But being porous and made of volcanic glass it allows excess water to drain much more readily than vermiculite.


In a case where you have especially thirsty plants and want the soil to hold extra water, vermiculite would be a better choice. You might find that perlite will dry out too quickly in this situation. But if you were growing cacti, you would eventually discover that the amount of water vermiculite holds would lead your plants to rot. Perlite, on the other hand, would be well-draining and suitable for your cacti mixture.


Vermiculite is also used in mycology to add moisture to the substrate that mushrooms will grow on. Perlite would fail miserably at this task. Perlite can also be used in mycology or horticulture to raise humidity levels. Because perlite has more surface area, it fosters higher humidity by evaporation off this extra surface area. Vermiculite would not work as well for this though because it would retain much more of that water.


So essentially, perlite and vermiculite are the same in that they can retain more water than many other things, and they can aerate soil. But vermiculite differs from perlite because it retains water and creates a soil mixture that retains water, whereas perlite fosters a well-draining soil mixture. Likewise, vermiculite’s tendency to retain water makes it a good additive to mushroom substrates but a bad candidate for increasing humidity. Perlite’s hard, porous nature makes it a great mechanism for increasing the humidity of a given area but disqualifies it as a candidate for creating a substrate that will retain moisture.


Compost Tea & Breeding Friendly Microbes

It's simple. Make this brew and use it on your garden and lawn. You are basically breeding beneficial bacteria and innoculating the ground with them giving a jumpstart to heal the soil. These are the organisms that get killed off with chemical fertilizers. These are the organisms vital to rich, balanced soil.


Here are a couple videos explaining the process. Very simple. The one fellow makes it seem a little bit more complicated, but the items you use to feed the bacteria are just a bit of molasses and some kind of fish/seaweed/organic non-burning fertilizer.


VIDEO ONE

VIDEO TWO


How To Make Organic Garden Soil

The Secrets of Topsoil Building

From the book: A Year On The Garden Path

by Carolyn Herriot

Illustration: Elayne Sears

For years I have been experimenting with feeding my topsoil so I can grow the healthiest plants. Now the plants in my garden are so lush and healthy I feel I have hit the nail on the head, so I want to let you in on my discoveries. They are so simple, and use only materials from natural sources. Best of all, they’re all free!

Before I share my ‘secrets’ with you, I’d like you to consider this little bit of basic logic. If soil provides nutrients essential for plant growth, then topsoil quality will determine the health of the plants. As they grow, plants constantly remove nutrients from the soil. If these nutrients are not replenished, then plant health is jeopardized. Insects and disease are attracted to unhealthy plants, so all the gardener’s problems begin when soil becomes depleted of essential plant nutrients. This is why the basic tenant of organic gardening is “feed the soil, and the soil will take care of the plants.”

Soil organic matter is created by decaying plants and the dying leaves, twigs and flowers that pile up loosely on the soil surface. Millions of soil-dwelling insects and organisms assist in the process of breakdown and decomposition, and their carcasses will eventually also enrich the soil. This continual process of decay is an essential part of nature’s cycle, and it is from this that fertile soil is created.

Contrary to popular belief, chemical fertilizers with synthetic origins do not restore soil health and fertility; in fact, they actually destroy physical and biological properties of soil. They can even combine with minerals already present, making them unavailable to plants. High concentrations of nitrogen, phosphorus and potassium from chemical fertilizers glut and overload plants. Plants outwardly look lush, but fast growth produces weak and watery tissues that attract pests and disease.

Replicating nature, by replacing soil nutrients and protecting the fragile soil web of life, results in healthy plants that do not attract problems with pests and diseases. All it takes is a bit of time in the dormant seasons – November, December, January and February – feeding the soil. These are the months when it’s cold out and you will relish some outdoor activity and exercise.

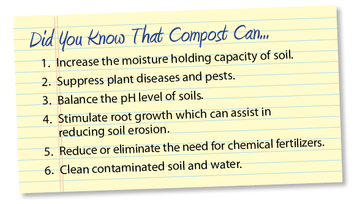
  1. Add compost to your garden. Compost is the gardeners’ version of humus, but it is produced much more quickly. The quality of compost as an organic soil additive depends on the residues from which it is made, as well as the extent to which decomposition has occurred. TIP: For best results, vary the layers of material when building the compost pile as much as possible, and provide air, moisture and heat for the fastest and most thorough breakdown.
  2. Add leaves and leaf mulch to the garden. Shredded leaves break down very easily, and create a soil tilth that is wonderful to work with and teems with earthworms. TIP: In the fall, run a lawnmower over a pile of leaves on the drive way. This reduces bulky leaves to one tenth of their volume, and results in a manageable pile of shredded leaves. Spread these over your beds in six-inch layers as soil-building mulch. Tree roots penetrate widely through topsoil and deep into subsoil, taking up valuable nutrients, that are then stored in the leaves. When leaves break down, they return these nutrients to the soil. Take full advantage of stockpiling leaves. I heap mine in a corner of the driveway and just forget about them. By spring the pile has started to break down into coarse leaf mulch, which we use in potting mixes and as garden mulch. After one full year, the pile will have broken down into beautiful, rich black leaf mulch, the texture of superb garden soil. This is perfect for mulching and enriching the garden.
  3. Add animal or green manure for a boost of nitrogen to the topsoil. Local farms are always eager for gardeners to take away their stockpiles of manure. I have cultivated a friendship with a neighbor who owns three horses. She only treats them homeopathically and with acupuncture, so I know there are no drug residues in their manure. This manure has no weed seeds either, as she uses untreated woodchips in the horse paddocks. Be cautious about manure mixed with hay, as it can spread grass and weed seeds over the garden.

Organic gardeners are concerned about the use of growth hormones and antibiotics in conventional livestock farming, as well as genetically modifies grains used in livestock feeds.Try to find a source of animal manure –horse, cow, chicken, sheep, llama, or rabbit – that has not been subjected to these inputs. If manure is not aged (if it’s either still steaming or retains a strong odor), it’s important to age it before you spread it on the garden. Do not harvest food from a garden until 120 days have passed, allowing time for the manure to be broken down and potential pathogens to be neutralized by myriad soil microorganisms

If you prefer, you can add nitrogen to soil using plant matter rather than animal residues. Grow a winter green manure crop of fall rye, winter pea, fava beans, winter barley or winter wheat, and plough it under in early spring. In spring/summer you can grow a warmer climate green manure crop using vetches, clovers, buckwheat, alfalfa, or phacelia. 


Illustration: Elayne Sears


Lasagna or Sheet Gardening is a method of gardening that is very low toil and low maintenance. The practice is to use layered materials alternating dry and green with some compost/manure and peat moss, or whatever you have readily available. Over a period of months these layers break down into a rich bed of soil filled with worms and beneficial organisms. It is a no dig way of creating new garden beds or enriching old beds. An indepth article can be found here at the Mother Earth News

website, article by Patricia Lanza.

Download
Materials For A No-Dig/Compost/Lasagna/Sheet Garden
Materials_for_Your_No_Dig_Bed.pdf
Adobe Acrobat Document 81.1 KB

Keyhole Gardening

This is another kind of layered/compost/no-dig garden bed that can be made in a small space and includes a central compost bin that feeds the garden as it ages. It is great for areas of poor soils, areas that are flood prone and the beds are especially accesible for the elderly or handicapped when made high enough. If you search 'Keyhole Garden' in a search engine, you'll see that every one of these gardens looks unique.


Click above to follow link to NPS.gov website for Fact Sheets on invasives.


The Broadfork is Your Friend


Hoes and How To Use Them

Here's a link to a good article about Hoemanship.

Illustration: Barbara Field

Sponsorship and the listing of sponsors on this site or at the garden is not an indication of endorsement by Washington Township or the Washington Township Community Garden.